> ## Documentation Index
> Fetch the complete documentation index at: https://docs.weya.ai/llms.txt
> Use this file to discover all available pages before exploring further.
# Custom Tool
> Extend your AI agent's capabilities by integrating any REST API as a custom tool.
Custom Tools allow you to connect **any HTTP REST API** to your voice agent. When a user asks a question or makes a request that requires external data or an action, the agent automatically calls your configured API and delivers the result — all in real time.
***
## How Tool Calling Works
When a tool is configured, the AI agent automatically detects when it's needed during a conversation:
1. **User asks a question** that requires an external action (e.g., "What's the EMI for a ₹3,00,000 course?")
2. **Agent generates a tool call** request with the extracted parameters.
3. **Platform executes the API** call asynchronously in the background.
4. **Result is returned** to the agent, which responds to the user with the information.
Tool execution is **non-blocking**. The agent continues listening and can respond to follow-up questions while the API call is in progress. Results are delivered automatically as soon as they arrive.
***
## Best Practice: Test in Postman First
Before adding a custom tool, always test the API in **Postman** first:
* If you've received a **cURL command**, paste it into Postman and test with multiple scenarios.
* Verify **response formats**, **error cases**, and **parameter requirements**.
* Identify which values are **static** (e.g., API keys) vs. **dynamic** (e.g., user-provided inputs).
This ensures the API works correctly before you integrate it into your agent.
***
## Configuring a Custom Tool
Navigate to your agent → **Knowledgebase and Tools** → **Custom Tools** → **New Tool**.
Below is a step-by-step walkthrough using an **EMI Calculation API** as an example.
### Step 1: Basic Information
Fill in the top section of the form:
| Field | Description | Example |
| ---------------- | ---------------------------------------------------------------------------------------------------------- | ------------------------------------------------------------------------------------------------ |
| **Tool Name** | A `snake_case` identifier for the tool | `emi_calculation` |
| **Description** | What the tool does and when to trigger it. Keep it concise — include the action and the trigger condition. | `Calculates EMI details including down payment and monthly installments for a given course fee.` |
| **HTTP Method** | The HTTP method for the API | `POST` |
| **Endpoint URL** | The full API endpoint URL | `https://dev.api.weya.live/ai/tools/emi-calculation` |
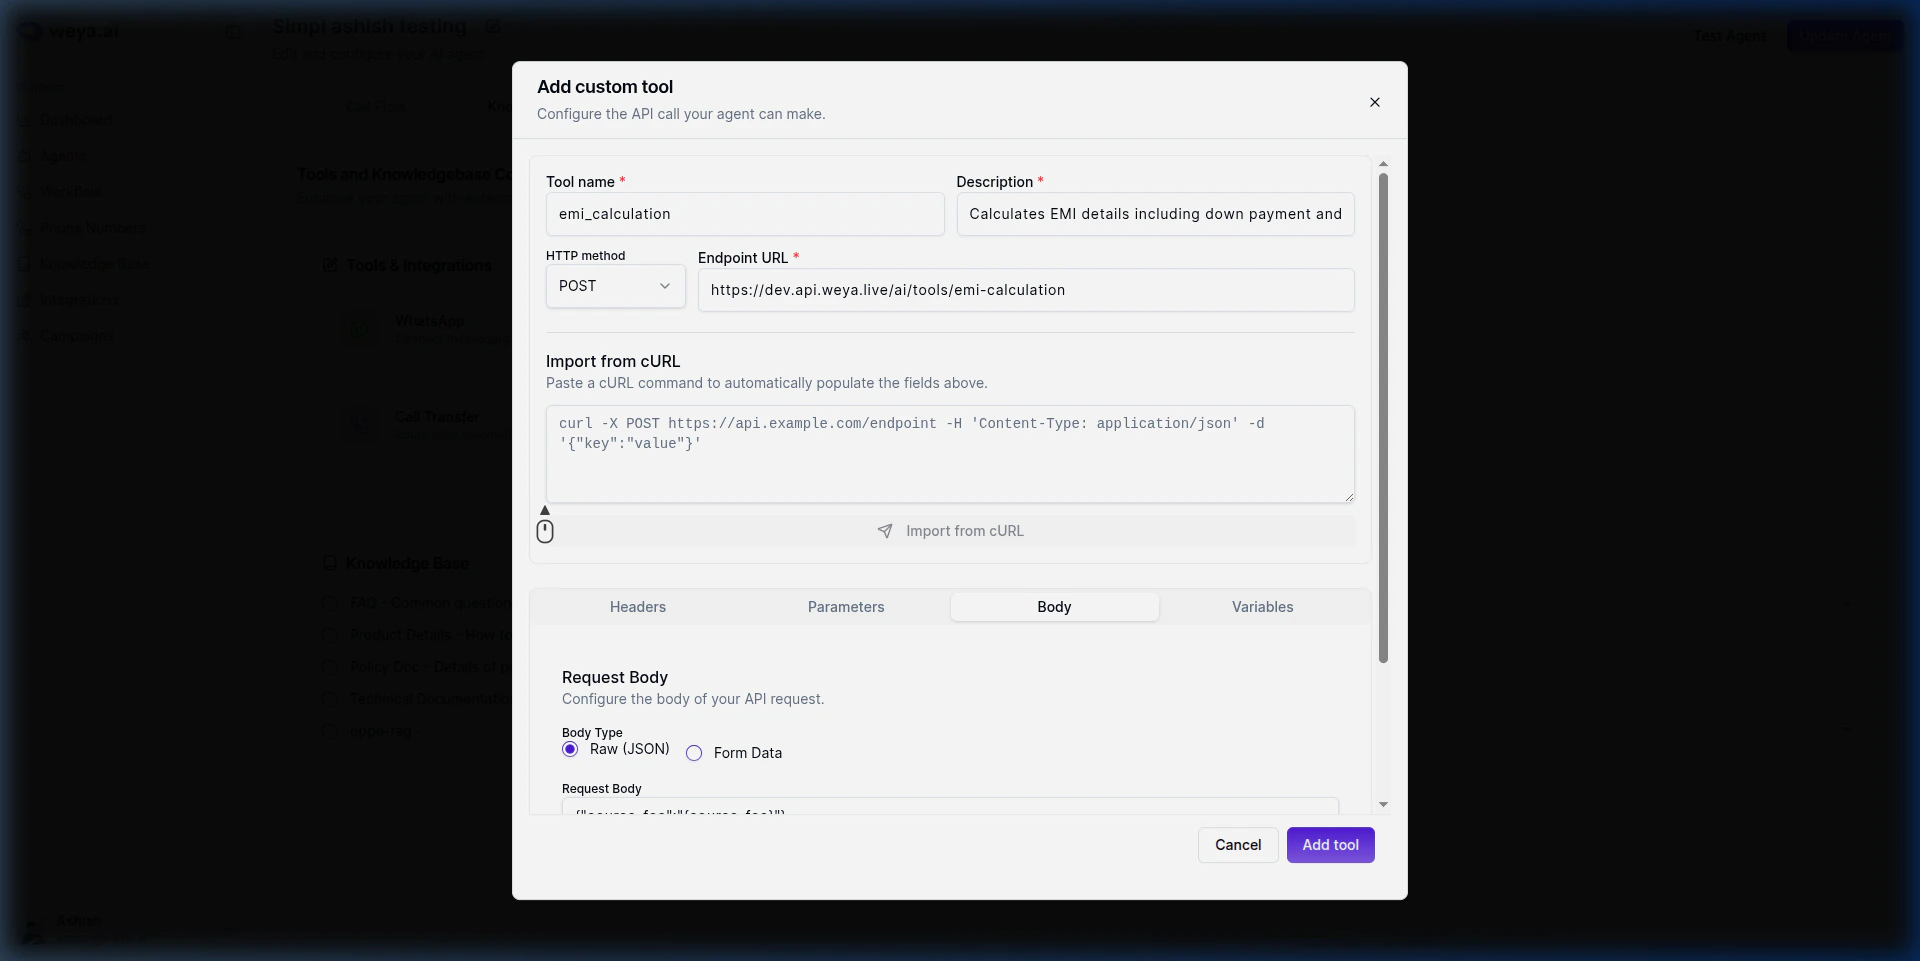 You can also use the **Import from cURL** feature to auto-populate these fields from a cURL command. Always verify the imported values after importing.
***
### Step 2: Headers
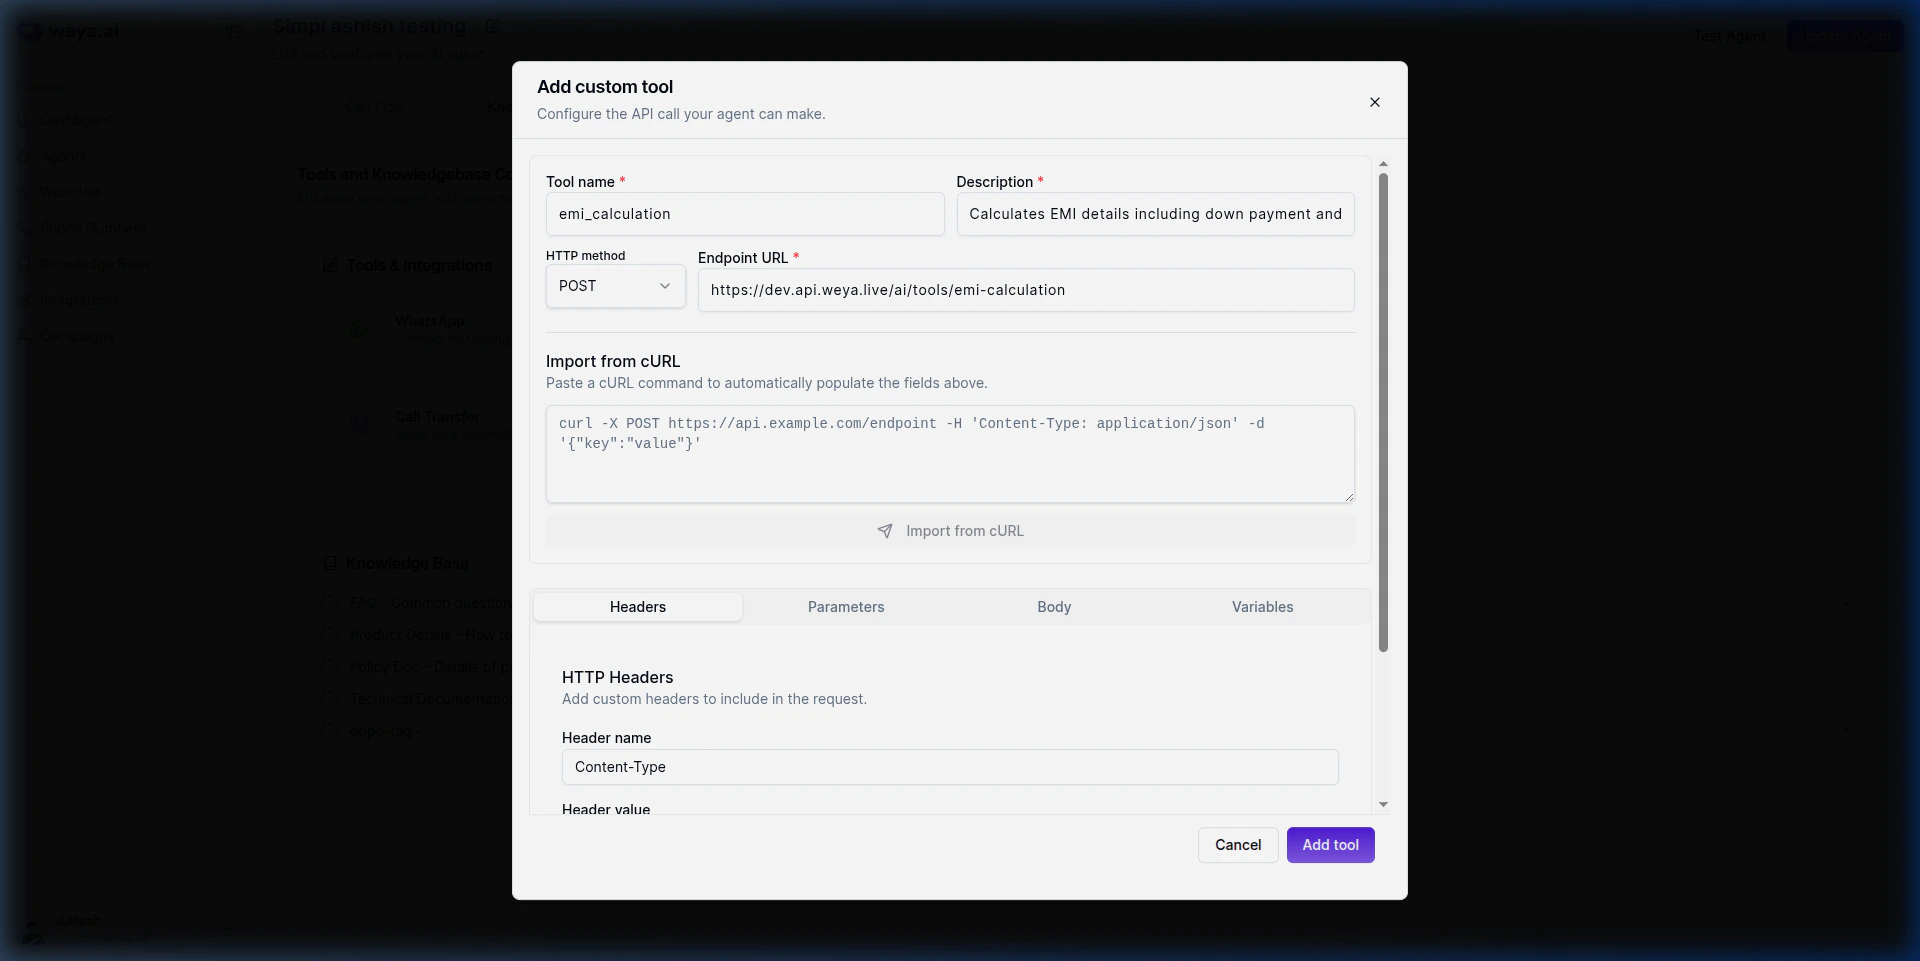
Switch to the **Headers** tab to add any HTTP headers required by the API.
Click **+ Add header** and enter the header name and value. For our example:
| Header Name | Header Value |
| -------------- | ------------------ |
| `Content-Type` | `application/json` |
Headers can contain:
* **Static values** — Fixed strings like `application/json` or `Bearer your-api-key`
* **Dynamic values** — Use `{variable_name}` syntax to inject runtime values
You can also use the **Import from cURL** feature to auto-populate these fields from a cURL command. Always verify the imported values after importing.
***
### Step 2: Headers
Switch to the **Headers** tab to add any HTTP headers required by the API.
Click **+ Add header** and enter the header name and value. For our example:
| Header Name | Header Value |
| -------------- | ------------------ |
| `Content-Type` | `application/json` |
Headers can contain:
* **Static values** — Fixed strings like `application/json` or `Bearer your-api-key`
* **Dynamic values** — Use `{variable_name}` syntax to inject runtime values
 ***
### Step 3: Request Body
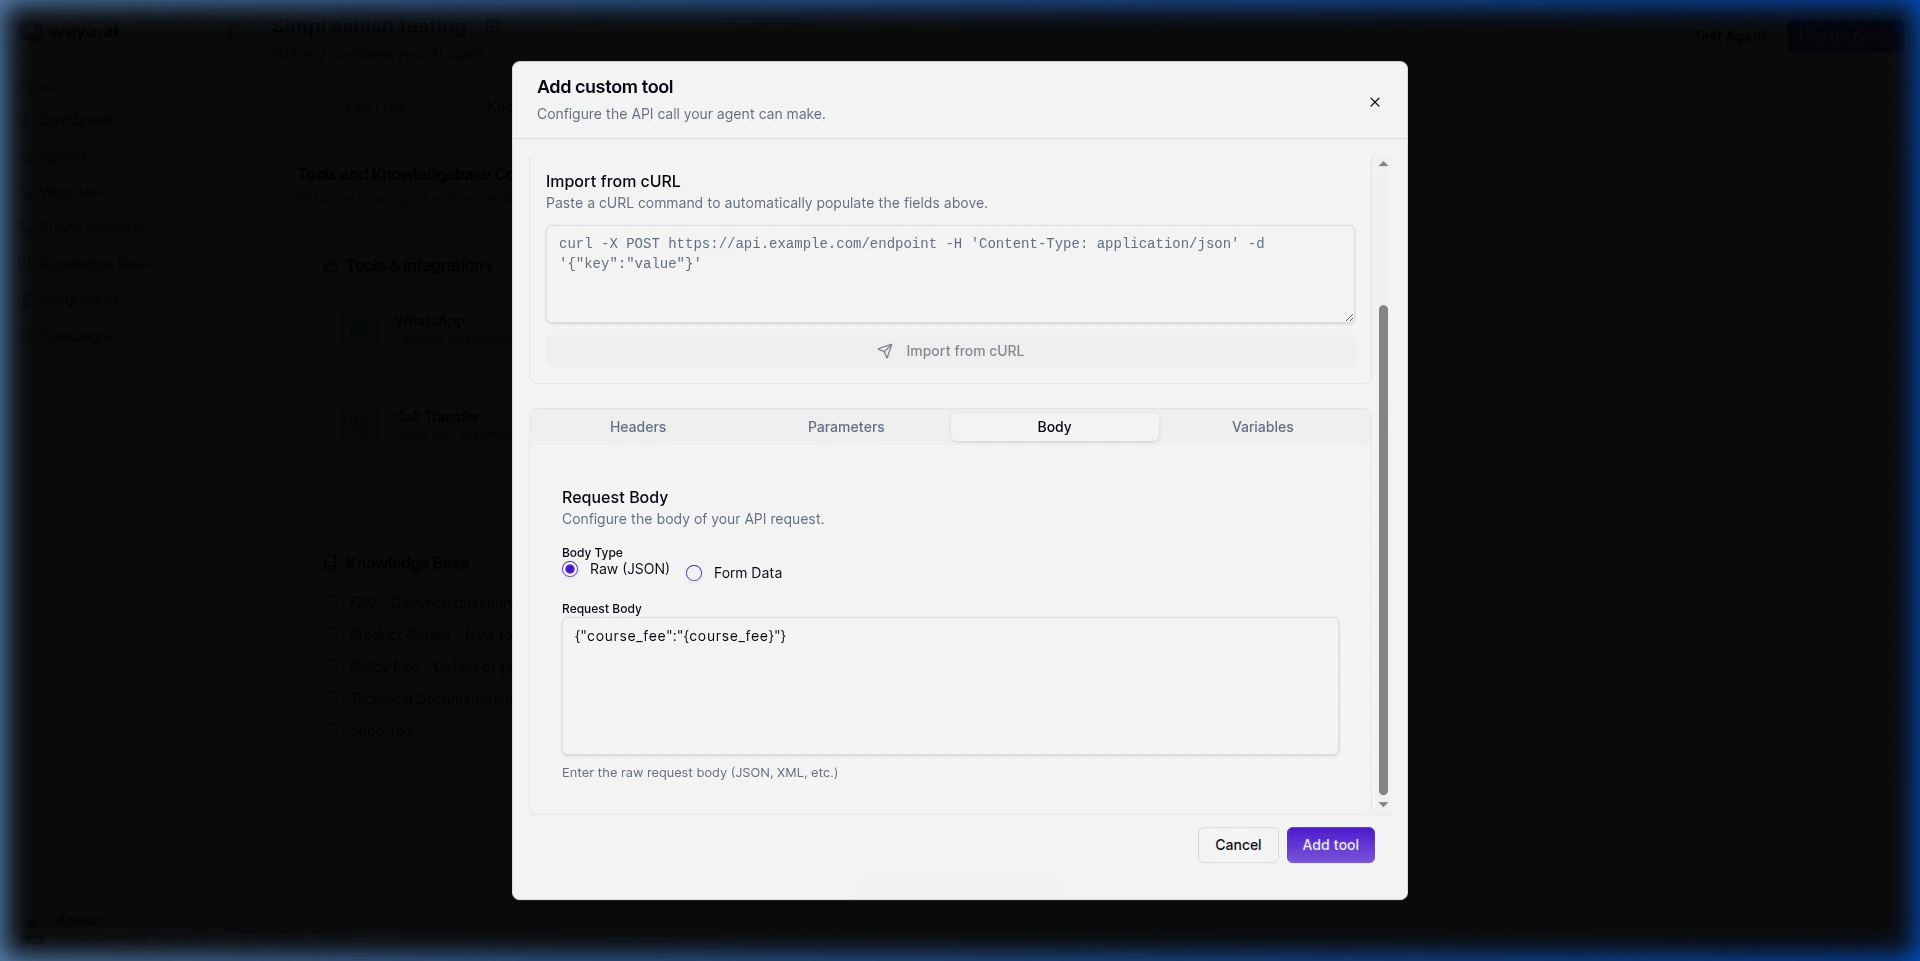
Switch to the **Body** tab to configure the request payload.
1. Select **Body Type**: Choose `Raw (JSON)` for JSON payloads or `Form Data` for form-encoded data.
2. Enter the **Request Body** with `{variable_name}` placeholders for dynamic values:
```json theme={null}
{"course_fee":"{course_fee}"}
```
The `{course_fee}` placeholder tells the system to inject the value extracted from the user's conversation at runtime.
***
### Step 3: Request Body
Switch to the **Body** tab to configure the request payload.
1. Select **Body Type**: Choose `Raw (JSON)` for JSON payloads or `Form Data` for form-encoded data.
2. Enter the **Request Body** with `{variable_name}` placeholders for dynamic values:
```json theme={null}
{"course_fee":"{course_fee}"}
```
The `{course_fee}` placeholder tells the system to inject the value extracted from the user's conversation at runtime.
 ***
### Step 4: Variables
Switch to the **Variables** tab. Click **Refresh Variables** to auto-detect all `{variable_name}` placeholders used in your headers, parameters, or body.
For each detected variable, configure:
| Field | Description | Example |
| ----------------- | ------------------------------------------------------------------------------------------ | ---------------------------------------------------------------- |
| **Variable Name** | Auto-detected from your configuration | `course_fee` |
| **Type** | Data type: `String`, `Number`, `Boolean`, `Array`, or `Object` | `Number` |
| **Description** | A short description telling the LLM what to extract and in what format (1-2 sentences max) | `The total course fee amount in INR. Must be a positive number.` |
***
### Step 4: Variables
Switch to the **Variables** tab. Click **Refresh Variables** to auto-detect all `{variable_name}` placeholders used in your headers, parameters, or body.
For each detected variable, configure:
| Field | Description | Example |
| ----------------- | ------------------------------------------------------------------------------------------ | ---------------------------------------------------------------- |
| **Variable Name** | Auto-detected from your configuration | `course_fee` |
| **Type** | Data type: `String`, `Number`, `Boolean`, `Array`, or `Object` | `Number` |
| **Description** | A short description telling the LLM what to extract and in what format (1-2 sentences max) | `The total course fee amount in INR. Must be a positive number.` |
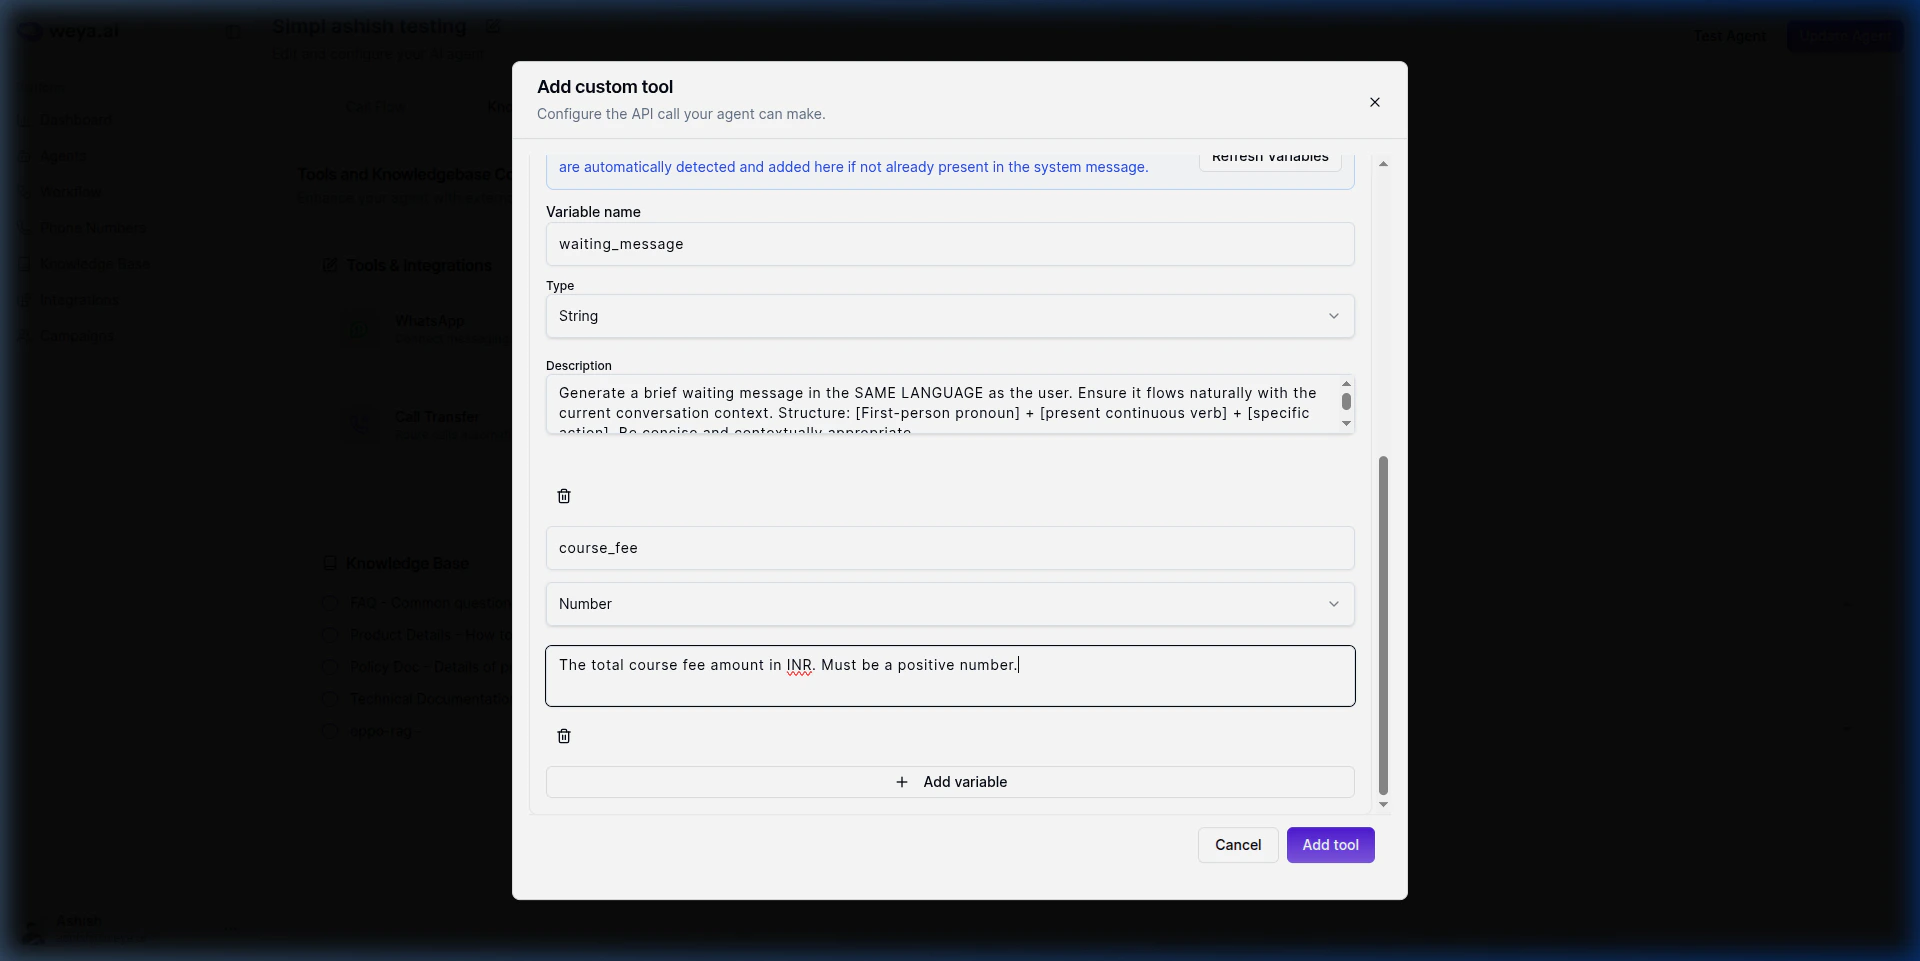 If a variable name **already exists in your system prompt** (e.g., from lead data), it will be treated as a lead variable and won't appear here. Only variables that the agent needs to **extract at runtime** from the conversation are listed.
***
### Step 5: Save the Tool
Once all fields are configured, click **Add tool**. The tool will be attached to your agent and can be referenced by the tool name you specified (e.g., `emi_calculation`).
***
## Static vs Dynamic Values
Understanding the difference is key to configuring tools correctly:
| Type | Description | Example |
| --------------------- | ------------------------------------------------------------------- | ---------------------------------------------------------------- |
| **Static** | Values that remain the same for every call | `Authorization: Bearer abc123`, `Content-Type: application/json` |
| **Dynamic (Lead)** | Values from lead/initial data, already present in the system prompt | Customer name, phone number |
| **Dynamic (Runtime)** | Values the agent extracts from the conversation during the call | Appointment date, course fee amount |
***
## Tips for Writing Good Descriptions
* **Tool description**: Clearly state what the tool does **and** when to use it. Example: *"Calculates EMI details for a given course fee. Use when the user asks about payment plans or EMI options."*
* **Variable description**: Specify what to extract and the expected format. Example: *"The appointment date in YYYY-MM-DD format."*
* Keep descriptions concise — 1-2 sentences maximum.
***
💡 **Tip**
After adding the tool, make a test call to your agent to verify the tool is triggered correctly and returns the expected results.
If a variable name **already exists in your system prompt** (e.g., from lead data), it will be treated as a lead variable and won't appear here. Only variables that the agent needs to **extract at runtime** from the conversation are listed.
***
### Step 5: Save the Tool
Once all fields are configured, click **Add tool**. The tool will be attached to your agent and can be referenced by the tool name you specified (e.g., `emi_calculation`).
***
## Static vs Dynamic Values
Understanding the difference is key to configuring tools correctly:
| Type | Description | Example |
| --------------------- | ------------------------------------------------------------------- | ---------------------------------------------------------------- |
| **Static** | Values that remain the same for every call | `Authorization: Bearer abc123`, `Content-Type: application/json` |
| **Dynamic (Lead)** | Values from lead/initial data, already present in the system prompt | Customer name, phone number |
| **Dynamic (Runtime)** | Values the agent extracts from the conversation during the call | Appointment date, course fee amount |
***
## Tips for Writing Good Descriptions
* **Tool description**: Clearly state what the tool does **and** when to use it. Example: *"Calculates EMI details for a given course fee. Use when the user asks about payment plans or EMI options."*
* **Variable description**: Specify what to extract and the expected format. Example: *"The appointment date in YYYY-MM-DD format."*
* Keep descriptions concise — 1-2 sentences maximum.
***
💡 **Tip**
After adding the tool, make a test call to your agent to verify the tool is triggered correctly and returns the expected results.